- Before installing Red5 we need to make sure java is installed on the target machine. Because Red5 needs to java.
- If java is not installed then download the latest version of java and install it.
- Make sure the JAVA_HOME environment variable is set to the java installed root directory.
- To set the environment variable, right click "My Computer" in start menu/desktop and go to properties. Go to "Advanced" tab and there you will see a button named "environment variables" at bottom. Clicking it will open a dialog which will let you add your own variable. Click "New" button in the top section i.e., User variables and int the popup eneter JAVA_HOME for variable name and root directory of the java for variabl value as shown below

- Now you are ready to install the Red5. Download the latest version of Red5 from http://code.google.com/p/red5/ and install it.
- During the installation you may be asked to enter your ip address and port number (for version Red5 0.9.0 Final) to run the http protocol for Red5. You can enter your ip address or the dns name. But you must remember this as this is the one you need to use always. If you enter ip address during installation and use dns name in application then it will not work. You should use the one what you entered during installation. I don't know the reason but I experienced this. But if you are not asked to enter IP address (for version Red5 0.8.0 Final) then there will be no issues with the dns name to access the server. In this case the default port number is 8080.
- After Red5 installation is complete then you need to start the service.
- You can verify whether the Red5 is running and working fine by browsing to http://ip_address:port_number in any browser. The ip_address and port_numbers should be same as the ones entered during installation. Or the dns name and default port number 8080 will work work in the second case explained in the above step. If the server is working fine then you will be able to the server's home page which will talk about some demos, etc.
Showing posts with label install. Show all posts
Showing posts with label install. Show all posts
Tuesday, June 1, 2010
Installing Red5 on windows
Installing Red5 is easy as explained below.


Sunday, November 8, 2009
Installing IIS 7.0 on Windows Server 2008
Let me explain my experience on installing IIS 7.0 on windows server 2008. I had a tough time to find a way to install IIS 7.0 on windows server 2008. I thought that it would be same as installing IIS 6.0 on windows server 2003 by going to "control panel" -> "Add or Remove Programs" -> "Add/Remove Windows Components" and install IIS. But I couldn't find this in windows server 2008. After doing a long research I found a link which helped me.
I followed the below steps to install IIS 7.0 on windows server 2008.
- Go to "Start" -> "Administrative tools" -> "Service Manager".
- Right click the node "Roles" in the "Service Manager" window and click on "Add Roles".
- Follow the wizard.
- Select web server(IIS) in 2nd step of the wizard.
- You might get the following popup immediately. If you get this please click "Add Required Role Services".

- You follow the wizard until you get the below step.

- Follow the wizard until the final step.
- That's it. You are done with installing IIS 7.0 on windows server 2008.
- If you face any problems please follow the below link. It has detailed step by step guidelines to install the IIS 7.0 on windows server 2008. http://learn.iis.net/page.aspx/29/installing-iis-70-on-windows-server-2008/


Thursday, September 10, 2009
How to create a setup project to install windows services
This post assumes that you have knowledge on windows services and how to create a windows service using visual studio. People who don't know how to create windows service please learn here.
Please follow below steps to create a setup project
1. Create a visual studio solution with a project of type Windows Service as explained in http://cherupally.blogspot.com/2009/09/how-to-create-windows-service-in-dot.html
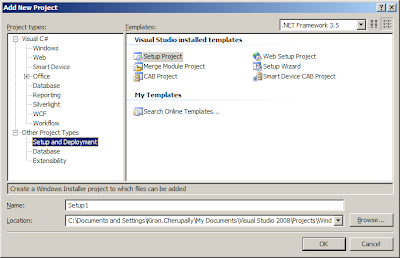
2. Add a new project of type "Setup Project" to the solution as shown below
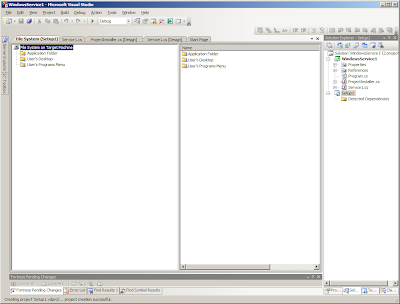
2. Once you click on OK button in the above step, you will see the screen below. There you notice a new project named "Setup1" is added.
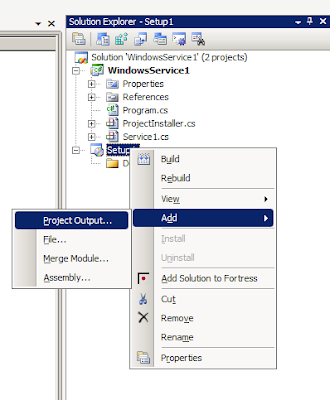
3. Now right click on Setup1 project in the solution and click "Add Project Output" as shown below.
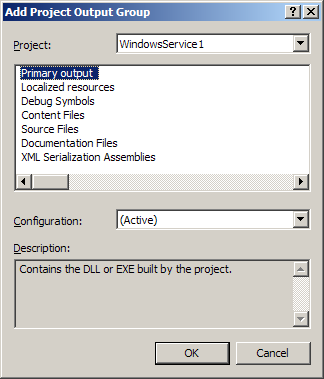
4. In "Add Project Output Group" dialog box shown below, select the windows service project in the drop down and click OK.
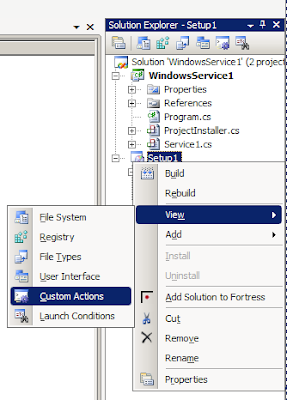
5. The above 4 steps are only to copy all the assemblies to specifies installation folder. Setup will not install the services in the system. To tell the setup to install services we must add custom actions. To open the custom actions window right click "Setup1" project in solution explorer and click View->Custom Actions as shown below.
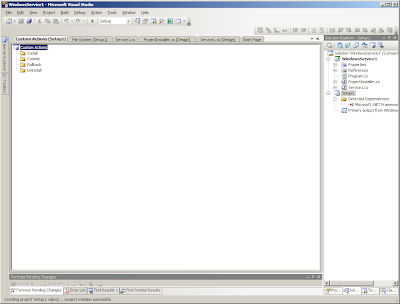
6. You will see the Custom Actions tab opened like this.
7. Right click on "Custom Actions" and click "Add Custom Action".
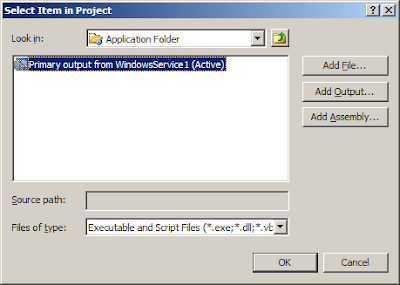
8. That will open a dialog box which lets you choose the items from "Application Folder". Select "Primary Output From WindowsService1" in "ApplicationFolder" and click OK.
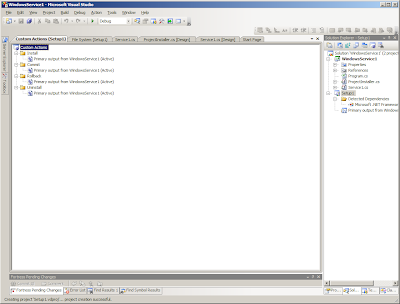
9. The above step will add this custom action to all sub folders "Install", "Commit", "Rollback", "Uninstall". Finally you will see the screen like this.
10. Build the "Setup1" project. Now you are ready to use this setup project to install/uninstall windows services. Take the setup build from WindowsService1\Setup1\Debug and use it to install/uninstall when needed.


Please follow below steps to create a setup project
1. Create a visual studio solution with a project of type Windows Service as explained in http://cherupally.blogspot.com/2009/09/how-to-create-windows-service-in-dot.html
2. Add a new project of type "Setup Project" to the solution as shown below

2. Once you click on OK button in the above step, you will see the screen below. There you notice a new project named "Setup1" is added.

3. Now right click on Setup1 project in the solution and click "Add Project Output" as shown below.

4. In "Add Project Output Group" dialog box shown below, select the windows service project in the drop down and click OK.

5. The above 4 steps are only to copy all the assemblies to specifies installation folder. Setup will not install the services in the system. To tell the setup to install services we must add custom actions. To open the custom actions window right click "Setup1" project in solution explorer and click View->Custom Actions as shown below.

6. You will see the Custom Actions tab opened like this.

7. Right click on "Custom Actions" and click "Add Custom Action".
8. That will open a dialog box which lets you choose the items from "Application Folder". Select "Primary Output From WindowsService1" in "ApplicationFolder" and click OK.

9. The above step will add this custom action to all sub folders "Install", "Commit", "Rollback", "Uninstall". Finally you will see the screen like this.

10. Build the "Setup1" project. Now you are ready to use this setup project to install/uninstall windows services. Take the setup build from WindowsService1\Setup1\Debug and use it to install/uninstall when needed.
Subscribe to:
Posts (Atom)


